 Skip to content
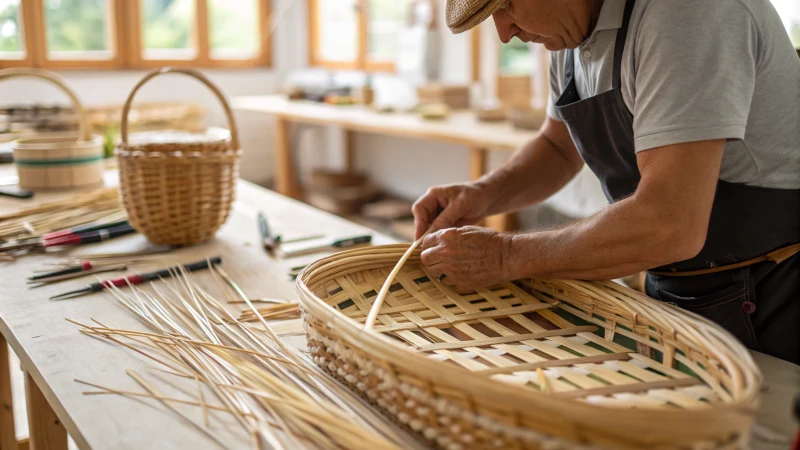
Are you prepared to explore the craft of basket weaving? I recall the first moment I held a piece of rattan. It felt like a connection with nature. It was both exciting and calming.
Creating a rattan basket involves gathering the right materials. Beginners should learn basic weaving techniques. Personal touches add unique beauty to the piece. This guide provides a clear, step-by-step process. It helps newcomers craft their own rattan basket.
Creating a rattan basket is more than just a craft; it’s a journey. You begin by collecting beautiful rattan strands. Each strand tells its own story. Next, you learn basic weaving techniques. These techniques change the strands into something useful and stunning. I often include personal touches. I add my favorite color or a unique pattern. This makes each basket truly mine. It’s a very rewarding experience!
Rattan is the only material used for basket weaving.False
While rattan is popular, other materials like willow or bamboo can also be used for basket weaving.
Basic weaving techniques are essential for making rattan baskets.True
Mastering basic weaving techniques is crucial for crafting sturdy and aesthetically pleasing rattan baskets.
What materials do I need to make a rattan basket?
Are you thrilled to enter the world of rattan basket weaving? Believe me, it’s a journey worth experiencing! Let’s look at the important materials you need for this creative journey.
To create a rattan basket, gather rattan strips, scissors, a soaking basin, clips or weights and optional glue for extra strength. These items help your basket look nice and last long. Baskets that are both beautiful and durable are truly special.

Important Materials for Rattan Basket Weaving
To make a nice rattan basket, you need several important materials. Each plays an important role in the basket’s look and strength.
-
Rattan Strips
Rattan strips are the heart of your basket. They come in different sizes and thicknesses, letting you design them your way. I always choose natural, sustainably sourced rattan. It looks beautiful and it lasts long. Really important!
For detailed sourcing options, check out rattan suppliers1. -
Scissors or Rotary Cutter
Sharp scissors or a rotary cutter are necessary. They cut rattan strips to the lengths you need. A rotary cutter gives precise cuts for detailed designs. Use a cutting mat to keep your area clean. -
Water or Soaking Basin
Soaking rattan strips in water softens them. This step makes bending easy and prevents breaking. A big basin lets you soak many strips at once. This really saves time! -
Clips or Weights
Clips or weights help you while you weave. They hold the rattan in place, keeping the basket’s shape. Clothespins or small weights work well for this. -
Glue (Optional)
For added strength, glue is handy at the joints or ends of rattan strips. It’s not always needed, but it helps keep the basket intact.
Optional Decorative Elements
If you love adding personal touches, decorative elements make your basket more appealing:
- Dyes or Paint: Use natural dyes to color your rattan strips before weaving them into a basket. This creates beautiful visual effects and shows your style.
- Fabric Liners: Put fabric liners inside baskets for a splash of color. They also protect delicate items.
- Beads or Other Embellishments: Adding beads to rattan strips gives your basket unique character. Little details make it one-of-a-kind.
Basic Tools Needed for Rattan Basket Weaving
| Tool | Purpose |
|---|---|
| Rattan Strips | Main weaving material |
| Scissors | Cutting rattan strips to size |
| Soaking Basin | Softening rattan strips |
| Clips/Weights | Holding the basket in shape while working |
| Glue | Optional, for added strength at joints |
Gathering these tools and materials helps you create wonderful rattan baskets with stories. Discover more detailed designs and techniques at basket weaving techniques2. Every weave is not just a stitch; it’s a new memory! It’s exciting to see your creations.
Rattan strips are essential for basket weaving.True
Rattan strips serve as the primary material for constructing rattan baskets, crucial for both structure and aesthetics.
Glue is mandatory for making a rattan basket.False
Glue is optional in rattan basket making, used only for added strength at joints, not required for all projects.
What are the basic weaving techniques for beginners?
Do you feel a strong desire to craft something beautiful with your hands? Weaving is a truly rewarding journey. Starting with the basics is the ideal path to begin your creative adventure. Let’s explore the important techniques every beginner should learn!
If you’re just beginning with weaving, concentrate on four main techniques꞉ plain weave, twill weave, basket weave and leno weave. Each technique offers its own special textures and patterns. These techniques provide a strong base for your crafting abilities. You will build your skills upon these fundamentals. Crafting skills start with these techniques.

When starting out in weaving, it’s essential to grasp some basic techniques that will lay a strong foundation for your craft. These techniques not only help in creating beautiful pieces but also enhance your understanding of the materials involved. Let’s explore a few fundamental weaving techniques suitable for beginners.
Plain Weave
The plain weave is one of the simplest and most commonly used techniques. In this method, the weft thread goes over and under the warp threads alternately. This creates a sturdy and balanced fabric.
- Characteristics: Strong and flexible, which means it suits many projects.
- Applications: From warm placemats for your table to complex wall art that impresses your guests.
If you’re ready to begin, have a look at plain weave tutorials3.
Twill Weave
Twill weaving involves a pattern where the weft thread crosses over two or more warp threads before going under one, creating a diagonal ribbing effect. This technique adds texture and visual interest to the fabric.
| Advantages | Disadvantages |
|---|---|
| Produces strong fabric | Requires more skill |
| Great for draping | Can be less stable |
| Unique patterns available | Limited uses in some applications |
Learn more about this elegant method through twill weave guides4.
Basket Weave
The basket weave mimics the appearance of a woven basket, where two or more weft threads are alternated over and under multiple warp threads. This technique provides a unique texture and is often used in creating sturdy textiles.
- Common Uses: Ideal for making bags, rugs, and decorative items.
- Tips for Beginners: Start with thicker yarns to make the process easier.
For visual aids on basket weaving, visit basket weave resources5.
Leno Weave
Leno weaving is a technique that twists pairs of warp threads around the weft thread. This method creates an open weave structure that allows light to pass through while maintaining integrity in the fabric.
- Benefits: Produces light fabrics perfect for breezy clothes or decor.
- Drawbacks: Trickier than other basic methods, but don’t let it scare you!
For step-by-step instructions on leno weaving, refer to leno weave techniques6.
Conclusion
Mastering these basic weaving techniques will enable beginners to create diverse projects while developing their skills further. Practice is key, so don’t hesitate to experiment with different materials and patterns as you become more comfortable with your weaving journey!
Plain weave is the simplest weaving technique for beginners.True
Plain weave alternates the weft over and under warp threads, making it easy to learn and versatile for various projects.
Leno weave is the easiest technique for beginners to master.False
Leno weave involves twisting warp threads, making it more challenging than other basic techniques like plain or basket weave.
How can I make my rattan basket design truly my own?
Are you ready to change your rattan baskets into personal expressions of your style? Let’s explore creative methods to pour your personality into these adaptable decor items!
Personalizing your rattan basket design is easy. Try using paint to decorate. Another idea is to add fabric linings. You could also use tassels and beads for decoration. Custom sizes are possible. Nature-inspired accents might add a special touch.

Explore Painting Techniques
Personalizing my rattan basket began with bright colors. I felt excited picking my favorite acrylic paints. I painted the basket to fit the lively vibe of my living room. Painting it sunny yellow instantly brought more light to the space. I smiled every time I walked by.
- Preparation: Clean the basket’s surface thoroughly first. Trust me, it really matters!
- Technique: Painter’s tape helps keep areas untouched, creating very neat lines.
- Finishing Touches: Seal your artwork with clear varnish to increase its durability.
For more painting advice, check out painting strategies7.
Adding Fabric Linings
Lining a rattan basket with fabric feels magical. I picked floral patterns that remind me of summer. These patterns bring a nostalgic vibe every time I use the basket. Choosing fabrics that match your style can change the basket’s look in surprising ways.
| Fabric Type | Ideal Use |
|---|---|
| Cotton | Everyday storage |
| Linen | Decorative use |
| Burlap | Rustic themes |
- Sewing Tips: Cut fabric slightly larger than the basket’s inside for a snug fit. I learned this when my fabric was too small!
- Attachment: Fabric glue or sewing keeps the fabric in place; I like sewing because it gives me more control and feels like crafting something special.
Explore more fabric tips in our guide on choosing materials8.
Incorporating Decorative Elements
Decorative elements really bring personalization to mind. I love attaching tassels and beads to my baskets. These details tell a story and reflect my creativity. Each decoration feels like a part of me woven into the design.
- Tassels: Attach colorful tassels to the basket’s rim for a bohemian vibe; I once visited a craft store just for the perfect colors!
- Beading: Hot glue secures beads around edges or handles, adding sparkle and glam.
- Stencils: Use stencils with paint or markers for unique designs; I’ve created stencil art that reminds me of my favorite trips.
For more ideas on embellishments, visit creative embellishments9.
Custom Sizes and Shapes
Realizing I could customize my rattan baskets revealed new possibilities! I contacted local craftsmen to make baskets fitting perfectly in my home’s little nooks.
If you want to meet local artisans, check our network at artisan connections10.
Utilizing Nature-Inspired Elements
I love bringing nature into my home. Adding dried flowers or greenery to my rattan baskets changed everything; it adds texture and creates a calm feeling in my space.
- Dried Flowers: Arranging them inside gives a rustic touch, making me feel closer to nature.
- Greenery: Using the basket for small succulents or herbs is both pretty and useful; my kitchen looked more alive with little herb plants!
Learn how to style with natural elements in our post on nature-inspired decor11.
Painting rattan baskets can enhance their aesthetic appeal.True
Using paint on rattan baskets allows for color customization, making them fit better with your home decor or stand out as statement pieces.
Adding fabric linings is unnecessary for rattan baskets.False
Incorporating fabric linings enhances the look and functionality of rattan baskets, making them more personalized and stylish.
What are some common mistakes to avoid when making a rattan basket?
Creating a rattan basket is not just a hobby for me. It is a journey filled with creativity and some challenges along the way. Crafting these baskets is probably a rewarding adventure. If you are starting this craft, you should discover some common mistakes to avoid. This knowledge will really make your experience smoother and more enjoyable.
To avoid common mistakes when crafting a rattan basket, focus on uniform rattan strips. Soak the material thoroughly. Keep the weaving tension steady. Plan your design thoughtfully. Secure the ends carefully. Apply final touches for strength and longevity.
Using Inconsistent Rattan Sizes
One common mistake is using rattan strips of inconsistent sizes, which can lead to an unbalanced appearance in the final basket. I used rattan strips of different sizes. It didn’t just look wrong; it felt wrong! The basket turned out unbalanced. Now, I always measure and cut my rattan strips to ensure uniformity. This simple step not only makes the basket look nicer but also improves its structural integrity.
Ignoring Proper Soaking Techniques
I learned the importance of soaking rattan the hard way, too. The first time, I skipped this step. Let me tell you, working with brittle rattan was no fun! Rattan needs to be soaked in water before weaving to become pliable. Ensure you soak your rattan for at least 30 minutes or until it’s flexible enough to work with.
Overlooking Weaving Tension
I also discovered the importance of even tension while weaving. At first, I pulled too tightly; my basket warped. Then, I went too loose; it began falling apart! Maintaining even tension while weaving is crucial. Check your tension regularly as you weave to ensure a consistent look and durability.
Neglecting to Plan Your Design
As an eager beginner, I jumped into weaving without a plan. Oh boy, did I regret it! Many beginners jump straight into weaving without a clear design plan, which can lead to mistakes in spacing and pattern repetition. Now, I spend time sketching my design beforehand; this saves me from wasting materials and helps me see the final product clearly.
Failing to Secure Ends Properly
Another mistake was not securing the ends of my rattan strips properly. Improperly securing the ends can cause unraveling and weaken your basket’s structure. Now, I use small clips or a bit of glue to keep everything in place while I work; this extra effort keeps my basket strong.
Skipping Finishing Touches
Finally, skipping finishing touches was a huge mistake for me as well. My early baskets had rough edges and looked unfinished. Finishing touches are essential for both aesthetics and durability—failing to sand down rough edges or apply a protective finish can leave your basket looking unfinished. Now, I sand down rough spots and apply natural oils or varnishes that align with eco-friendly practices.
By sharing these experiences, I hope to help you avoid common pitfalls in rattan basket weaving. Embrace the learning process! For more insights, explore advanced techniques12 or material sourcing tips13. Enjoy crafting beautiful pieces that reflect your unique style!
Using inconsistent rattan sizes affects basket appearance.True
Inconsistent rattan sizes lead to an unbalanced basket, compromising both aesthetics and structural integrity. Always measure for uniformity.
Skipping the soaking step makes rattan more durable.False
Soaking rattan is essential for flexibility; skipping this step can cause brittleness and breakage, reducing durability.
Conclusion
Learn the essentials of crafting a rattan basket, including materials needed, basic weaving techniques, personalization ideas, and tips to avoid common mistakes.
-
Discover essential tools and materials for rattan basket weaving to ensure a successful crafting experience. ↩
-
Learn various techniques and styles in basket weaving that will enhance your crafting skills. ↩
-
Discover comprehensive guides tailored for beginners in weaving that will enhance your learning experience. ↩
-
Learn more about twill weaving and how to incorporate this technique into your projects. ↩
-
Find visual aids and resources to help you understand basket weaving better. ↩
-
Get detailed instructions and tips on mastering leno weaving techniques for your projects. ↩
-
Explore personalized rattan basket ideas that can transform your living space while reflecting your unique style. ↩
-
Find practical tips for adding fabric linings and decorative elements to your rattan baskets. ↩
-
Learn about custom sizes and shapes for rattan baskets to perfectly fit your home decor needs. ↩
-
Discover how to incorporate natural elements into your rattan basket designs for a more eco-friendly approach. ↩
-
Get inspired by nature-themed styling tips that enhance your home decor with rattan products. ↩
-
Clicking this link will provide you with detailed techniques to elevate your rattan basket-making skills. ↩
-
This link offers valuable insights on sourcing high-quality rattan materials for your projects. ↩
