 Skip to content
Rattan chairs combine style and comfort perfectly. Over time, these attractive chairs often suffer damage. If your rattan chair looks worn, do not worry. I have experienced this too. Let’s explore how to bring it back to life together.
To fix a rattan chair properly, first look at the damage. Gather tools like glue or repair kits. Follow steps to bring the chair back to its original state. Right methods help the chair stay strong without losing its beauty. This guide explains easy ways to repair your rattan chair. It also shares advice on how to care for your furniture. These tips help your chair remain beautiful for many years.
I saw my beloved rattan chair fraying at the edges. I felt sadness. But repairing it is possible and satisfying. First, examine the damage closely. Take tools such as adhesive or a repair kit. Restore the chair to its former glory! Dedicated effort really transforms the chair. It looks new again. You feel proud for fixing it by yourself.
Rattan chairs are difficult to repair and maintain.False
Contrary to popular belief, rattan chairs can be easily repaired with the right tools and techniques, making maintenance manageable.
Assessing damage is the first step in repairing a rattan chair.True
Before any repairs, it is essential to evaluate the extent of damage to determine the appropriate repair methods needed.
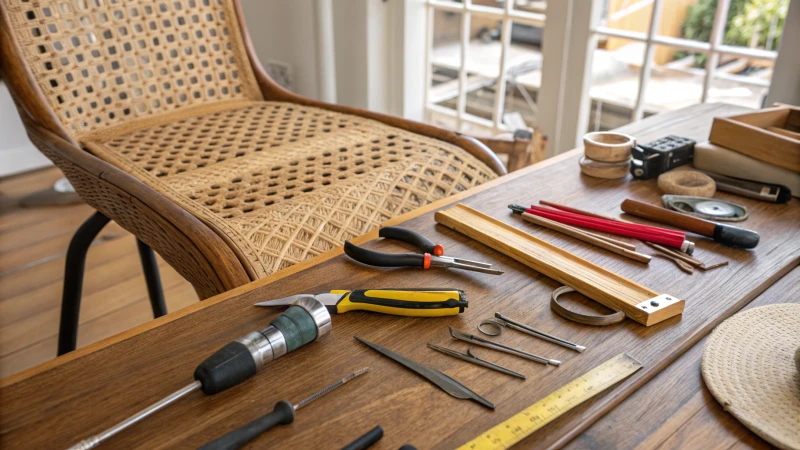
What Tools Do You Need for Rattan Chair Repairs?
Repairing rattan chairs may seem difficult. However, with the proper tools, it becomes a satisfying task. I will share the items needed to revive your cherished furniture.
To fix rattan chairs, gather rattan splints, scissors, wood glue, pliers and clamps. Utility knives and measuring tape help with repairs. Correct tools give strong and professional results. Proper tools are very important.
Understanding Rattan Chair Repairs
To repair rattan chairs well, the right tools are necessary. These tools help make the process easier and give a professional look. Below are the essential tools you should consider:
-
Rattan Splints
Rattan splints are crucial for fixing broken strands in woven chairs. They come in many sizes and can be cut to fit the damaged area – make sure they match the original weaving. -
Scissors or Wire Cutters
Sharp scissors or wire cutters are needed to cut rattan splints to the right length. Trust me, clean cuts prevent fraying and keep repairs looking neat. -
Wood Glue or Rattan Adhesive
A strong adhesive bonds broken parts together securely. Choose one designed for rattan or wood, ensuring durability. For more details, check out glue types1. -
Pliers
Pliers are helpful for gripping and twisting rattan strands during weaving. They assist in tight spaces, maintaining the weave’s integrity. -
Clamps
Clamps hold pieces steady while the glue dries, preventing movement and creating a strong bond. This is very important in complex repairs where alignment matters.
Additional Tools to Consider
While the main tools above are vital, some extra items might improve your repair experience:
| Tool | Purpose |
|---|---|
| Utility Knife | For trimming excess rattan and cleaning edges. |
| Measuring Tape | To ensure accurate measurements for replacement parts. |
| Sandpaper | To smooth out any rough edges before applying glue. |
| Protective Gloves | To protect hands during repairs and handling tools. |
Tips for Successful Rattan Repairs
- Start by assessing the damage’s extent. This helps figure out which tools are needed and how complex the repair is.
- Gather all tools beforehand to keep the process smooth and avoid interruptions.
- Practice weaving on scrap pieces before repairing your chair. For detailed techniques, visit weaving tutorials2.
Rattan splints are essential for chair repairs.True
Rattan splints are crucial for replacing broken strands in woven chairs, ensuring structural integrity and aesthetic quality.
Clamps are unnecessary when using wood glue.False
Clamps are important for holding pieces together while glue dries, ensuring a strong bond during rattan chair repairs.
How Can You Prevent Damage to Rattan Furniture?
Rattan furniture probably adds elegance to any home. It’s not just about looks. Rattan needs care and attention to last long. I’ll share how I keep my pieces beautiful. You probably can do the same!
To avoid harm to rattan furniture, watch humidity and temperature, clean it correctly, shield it from weather and store it properly when not in use. Simple care keeps rattan pieces beautiful and safe.

Understanding Rattan Furniture
Rattan furniture is not only aesthetically pleasing but also requires specific care to maintain its beauty. To prevent damage, it is crucial to understand the properties of rattan, which is a natural vine that can be susceptible to environmental factors.
-
Humidity and Temperature Control: I learned that controlling humidity and temperature stops damage to rattan furniture. Keeping your rattan furniture in a climate-controlled environment can significantly extend its lifespan. Avoid placing it in areas with direct sunlight or near heating sources. Regularly monitor the room’s humidity levels, ideally between 40-60%.
-
Proper Cleaning Techniques: The correct cleaning methods are necessary. Dust and dirt can accumulate on rattan surfaces, leading to degradation over time. To clean rattan furniture:
- Use a soft, damp cloth for wiping down surfaces.
- Avoid harsh chemicals that can break down the fibers.
- For deeper cleaning, consider using a mixture of mild soap and water, applied gently.
-
Protection from Outdoor Elements: Protection against outdoor elements is very important. If your rattan furniture is used outdoors, consider investing in protective covers. Rain, sun, and wind can wear down the material. Make sure to:
- Bring furniture inside during inclement weather.
- Use breathable covers that do not trap moisture.
- Apply UV protectants specifically designed for rattan to shield it from sun damage.
-
Storage Solutions: Proper storage during off-seasons helps a lot. When not in use, store your rattan furniture properly. This means:
- Keeping it in a dry, ventilated space to prevent mold and mildew.
- Using padded furniture covers to prevent scratches during storage.
| Care Tip | Description | Frequency |
|---|---|---|
| Dusting | Use a soft cloth or duster to remove dust | Weekly |
| Deep Cleaning | Wipe with mild soap solution for thorough cleaning | Monthly |
| UV Protection | Apply UV protectant if used outdoors | Every 3 months |
| Humidity Control | Monitor levels; use a dehumidifier if needed | Ongoing |
Creating a loving environment for these beautiful pieces is key! By following these guidelines, you can ensure your rattan furniture maintains its charm for years to come.
Seasonal Considerations
Different seasons pose various challenges for maintaining rattan furniture. In winter, ensure your pieces are protected from frost damage; in summer, keep them shaded to avoid sun bleaching. Regularly check the condition of your furniture during seasonal transitions to catch any potential issues early.
Repairing Minor Damage
Minor damages such as scratches or loose strands can often be repaired at home. For example:
- Scratches: Sand lightly with fine-grit sandpaper and reapply a natural oil to restore shine.
- Loose Strands: Carefully weave back loose strands using a needle and strong thread.
By knowing how to manage minor repairs, you can prolong the life of your rattan items effectively.
For more comprehensive insights on protecting your rattan investment, consider exploring furniture maintenance tips3.
Rattan furniture should be kept in a climate-controlled environment.True
Maintaining a controlled humidity level of 40-60% prevents damage to rattan furniture by minimizing its sensitivity to environmental changes.
Direct sunlight can enhance the durability of rattan furniture.False
Exposing rattan furniture to direct sunlight can lead to fading and degradation, making it essential to keep it shaded.
What Techniques Can I Use for Different Types of Damage in RPGs?
I dived into the world of RPGs. I learned that every kind of damage needs a different strategy. Very different. Let’s discover some useful methods together. Sounds good?
In RPGs, varied damage types need specific tactics to deal with effectively. Players use armor to reduce physical damage. They counter magical attacks with counterspells. Knowing these strategies greatly improves your gameplay. This knowledge is very important.

Understanding Damage Types in Gaming
In my gaming experiences, I really value how damage splits into several kinds like physical, magical, elemental, and status effects. Each type usually needs its own special tricks to reduce harm or use it well. It’s like learning a new language – each one speaks its own way!
- Physical Damage: This is the classic melee and ranged attacks we all know. Armor, shields, and health potions really save lives against this type. One time, I entered a dungeon without enough armor. I learned the hard way!
- Magical Damage: This type comes often from spells or enchantments. I’ve faced magical problems, but I’ve learned. Anti-magic barriers and items that absorb magic really change the game.
Grasping how these types interact has been key for me in crafting my gaming strategies. It’s like fitting puzzle pieces that reveal the whole picture.
Techniques for Physical Damage
In reducing physical harm, I’ve tried a few strategies that work well:
| Technique | Description |
|---|---|
| Armor | Reduces incoming physical damage by providing protection. |
| Shields | Offers a temporary defense boost against attacks. |
| Evasion | Enhances character agility to dodge attacks. |
Using a mix of techniques has really improved my chances in fights. I remember one fierce battle where I had just one health potion left – surviving was a real thrill!
Techniques for Magical Damage
Magical damage brings unique challenges; specific methods are important:
| Technique | Description |
|---|---|
| Magic Resistance | Reduces the effect of spells on the character. |
| Anti-Magic Gear | Special items that negate or absorb magic. |
| Counterspells | Spells designed to nullify opponent spells. |
Using these techniques lets me withstand magical attacks effectively. Outsmarting a strong mage with just the right equipment feels very empowering!
Addressing Elemental Damage
Types like fire, ice, and lightning need special approaches based on what I’ve experienced:
- Fire Damage: Fire-resistant gear and potions have saved me from nasty burns in fights.
- Ice Damage: Heat-based spells or items counter freezing effects well – being stuck is not fun!
- Lightning Damage: Items with electrical resistance help reduce shock effects from electric enemies.
Every elemental type needs specific preparations to fight effectively. I’ve learned this through a lot of trial and error – mostly error!
Utilizing Status Effects
Status effects like poison, paralysis, and confusion can turn battles around. I’ve picked up some techniques over time:
| Status Effect | Technique |
|---|---|
| Poison | Antidotes or healing spells to cleanse effects. |
| Paralysis | Items or spells that provide immunity or resistance. |
| Confusion | Use of clarity potions or spells to regain control. |
Knowing how these effects work helps me plan better in fights. Once, confusion nearly cost me a win; now I always carry clarity potions!
For more insights into effective strategies for various damage types in RPGs, check out this comprehensive guide4.
Physical damage can be mitigated using armor and shields.True
Armor and shields are effective techniques to reduce physical damage in RPGs, enhancing character survivability during combat.
Magical damage cannot be countered with anti-magic gear.False
Anti-magic gear is specifically designed to negate or absorb magical damage, making it a viable countermeasure.
When Should I Consider Professional Repair Services?
Facing problems with appliances often feels very overwhelming. Many know the struggle of deciding between fixing it yourself or hiring professionals. Understanding when to ask for assistance is important. Sometimes, you might take on the challenge and handle the repair yourself.
When dealing with complicated appliance problems, skilled help is necessary. Persistent issues that do not resolve with do-it-yourself efforts need expert attention. Safety hazards also mean it is probably time to seek professional repair services.

Navigating Appliance Repairs
Navigating appliance repairs feels like walking a tightrope. I want to save money and enjoy fixing things myself. But some problems should be handled by experts. Knowing when to call professionals or do it myself is crucial for safety and effectiveness.
Understanding the Complexity of the Problem
Determining whether to hire a professional for appliance repairs often hinges on the complexity of the issue at hand. The first time my refrigerator acted up, I thought it was a simple fix, maybe a clogged filter. But I realized it wasn’t cooling at all. Understanding the complexity of appliance issues became essential for me. Simple problems, like changing a light bulb or cleaning a filter, often suit basic DIY skills. However, electrical malfunctions or deeper internal problems need special knowledge.
For instance, if you notice your refrigerator is not cooling properly, it could be a minor issue like dirty coils. But if the compressor is failing, it’s crucial to seek professional help to avoid further damage. Recognizing simple fixes vs. complex issues saves time and probably money too.
Evaluating Your Skill Level
Before any repair, I evaluate my skills honestly. If you have experience with repairs and feel confident in your abilities, you might handle minor issues effectively. However, if you’re unsure about your skills, it’s best to consult a professional.
Consider creating a checklist of your skills against the requirements of the repair task:
| Skills Required | Your Skills Level | Decision |
|---|---|---|
| Basic electrical knowledge | Intermediate | DIY possible |
| Troubleshooting appliances | Beginner | Hire a professional |
| Use of specialized tools | Advanced | DIY possible |
This table can help you gauge whether to proceed with a DIY approach or seek out professional services for more complicated repairs.
Potential Risks of DIY Repairs
Engaging in DIY repairs can come with risks that might outweigh the benefits. Common dangers include:
- Further Damage: Attempting to fix a problem without understanding it fully can result in more significant issues down the line.
- Safety Hazards: Electrical appliances can pose safety risks. A wrong move might lead to injuries or accidents.
- Warranty Voiding: Many appliances come with warranties that could be voided if unauthorized repairs are attempted.
Weighing these risks against potential savings is smart. Investing in professionals assures safety and reliability.
When Professional Services are Essential
Certain moments indicate the need for pros. Here are some scenarios where hiring an expert is advisable:
- Persistent Problems: If an appliance continues to malfunction despite your attempts to fix it, it’s time to call in a pro.
- Complex Systems: Appliances like HVAC systems or built-in ovens often require expert knowledge for proper diagnostics and repairs.
- Safety Concerns: If there’s any risk involved, such as gas appliances or electrical repairs, prioritize safety by hiring a licensed technician.
In these cases, professionals can provide expert diagnostics5 that ensure the problem is correctly identified and resolved without risking personal safety or additional damage.
Cost Considerations
While hiring professionals often comes with costs, it’s essential to consider their value as an investment. Quality repairs prolong appliance life and eventually save money over time.
You might want to compare potential costs of DIY versus hiring professionals:
- DIY Costs: Tools + Parts + Time + Risk of Errors
- Professional Costs: Service Fee + Parts + Expertise + Warranty on Work
This comparison clarifies whether DIY is worthwhile or hiring experts is wiser over time.
DIY repairs can void appliance warranties.True
Attempting unauthorized repairs may lead to warranty cancellation, risking future coverage on the appliance.
All appliance issues are suitable for DIY fixes.False
Not all problems can be solved by DIY; complex issues require professional expertise for safe resolution.
Conclusion
Learn effective methods to repair rattan chairs, including necessary tools and maintenance tips to keep your furniture looking beautiful for years.
-
Discover comprehensive guides on rattan chair repairs, enhancing your DIY skills with expert tips and techniques. ↩
-
Explore various weaving techniques that can elevate your rattan chair repair skills, ensuring a flawless finish. ↩
-
Discover expert insights on maintaining rattan furniture to enhance its longevity and appearance. ↩
-
Discovering these resources can provide you with in-depth knowledge on combat strategies tailored for specific damage types. ↩
-
Explore this link for expert insights on common appliance issues and when it’s best to seek professional help. ↩
